I
recently got an idea, make a program that calculates checksums of files
and stores those in a database. Then a customer can generate a
foot-print, a set of checksums, of what is actually installed.
One
important thing needed to complete this is knowing what we actually are
installed. What file a product version contains. Many of our installers
are MSI:s. How to you know which files an arbitrary MSI contains?
Well,
an MSI can contain basically anything, anyhow. Including custom actions
that makes arbitrary changes, adding or removing files. So I'll start
with reducing the issue to assume that it is a "regular" MSI-file. That
the files contained in the MSI-file will be the actual files the MSI
will install.
Also,
one big problem that I will ignore is that many installers ain't
MSI-files. It is a an EXE-file which contains a MSI-file, hidden inside
it's gut. Hopefully I will get to that issue later, in another post.
So I did some digging around, how do you actually open and look at a MSI file. I have previously frequently used Orca to look at the contents of MSI and MSM (merge modules). That is a start.
File table
I think a sample is needed. TortoiseSVN is delivered as an MSI. Version 1.7.2
If we open the MSI in Orca and look at the File table we can se that some files seem to be there. (One idea is also to sneek-peak at the MSDN specification for the table.) The File column seems to contain some sort of ID, Column probably also. Filename sure sound like ball on the money.
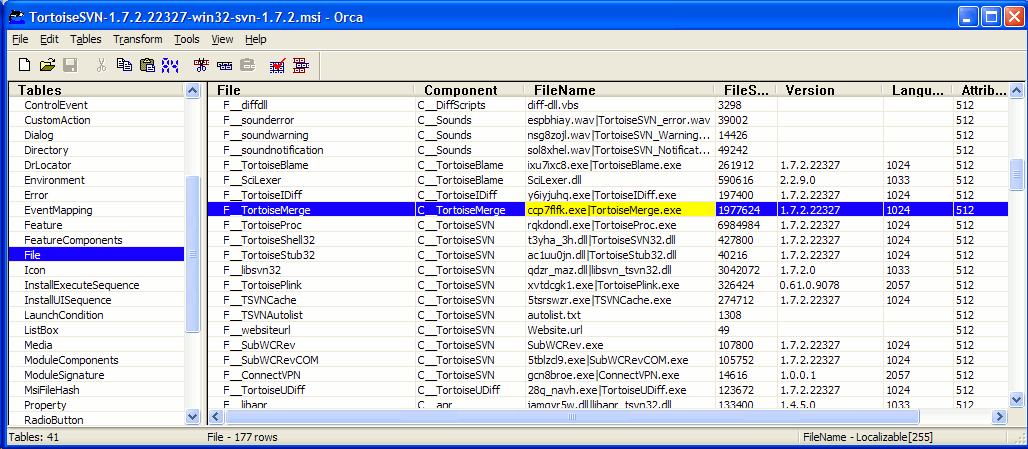 However, scrollong down some of the filenames are gibberish. Being human, looking at ccp7flfk.exe|TortoiseMerge.exe I would guess that the second part after the pipe-character is the proper filename. But how would a program do?
Further investigation shows that Filename in MSI is a type of it's own. MSDN says: To include a long file name with the short file name, separate it from the short file name with a vertical bar (|).
For my purposes that either means "use data efter pipe-charater", or
perhaps "use both". But since my target platform isn't MSDOS I can rely
on "longnames" working.
However, scrollong down some of the filenames are gibberish. Being human, looking at ccp7flfk.exe|TortoiseMerge.exe I would guess that the second part after the pipe-character is the proper filename. But how would a program do?
Further investigation shows that Filename in MSI is a type of it's own. MSDN says: To include a long file name with the short file name, separate it from the short file name with a vertical bar (|).
For my purposes that either means "use data efter pipe-charater", or
perhaps "use both". But since my target platform isn't MSDOS I can rely
on "longnames" working.
Directory table
So the File table says what files really should be named. But not where they should be. To solve this we have to look at the Directory and Component tables in combination. The File table contained an external reference to the Component table.
 A quick peek in the Component table tells us that there is a reference to the Directory table. If we know the component of a file (which the File table tells us) we know the directory.
(Also, since each component only has one directory referenced, this limits a component to one folder on disk.)
Continuing, if we look at the Directory table we can seen that the first directory is INSTALLDIR.
A quick peek in the Component table tells us that there is a reference to the Directory table. If we know the component of a file (which the File table tells us) we know the directory.
(Also, since each component only has one directory referenced, this limits a component to one folder on disk.)
Continuing, if we look at the Directory table we can seen that the first directory is INSTALLDIR.  It should probably be mentioned that INSTALLDIR is an arbitrary name. The only thing telling me that it is the main-folder of SVN is that the parent is D__ProgramFilesFolder, which parent in turn is TARGETDIR.
So now we know where a file should go, if we only have the file. Let's start looking for where the actual bytes are hidden.
It should probably be mentioned that INSTALLDIR is an arbitrary name. The only thing telling me that it is the main-folder of SVN is that the parent is D__ProgramFilesFolder, which parent in turn is TARGETDIR.
So now we know where a file should go, if we only have the file. Let's start looking for where the actual bytes are hidden.
Media table
After some looking around I found that I should look in the Media table. There lies all attached media files.
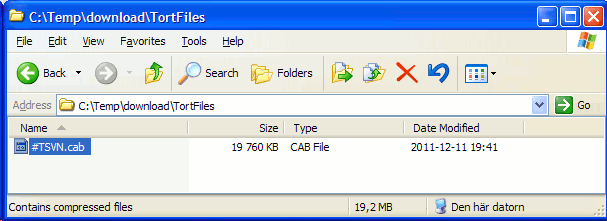
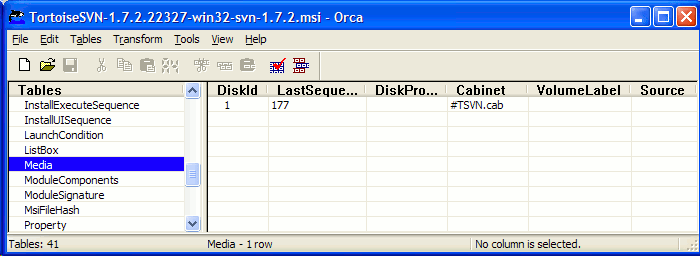 Well
that is a bit of a disappointment, the files are not here either! Just
some cab-file. Also cab-files are not the most easy thing in the
world to extract. If we can believe Wikipedia and MSDN
the contents might be compressed by any of four algorithms. File too
large for a single CAB-file might continue to the next file. (But no
more then 15 files might overlap to the next cab-file at a time.
Thanks.)
Well, extracting the CAB-file is not too hard. Fetch the record. Open a stream from column four. it seems like. Then we only have to worry about reading a CAB-file...
Well
that is a bit of a disappointment, the files are not here either! Just
some cab-file. Also cab-files are not the most easy thing in the
world to extract. If we can believe Wikipedia and MSDN
the contents might be compressed by any of four algorithms. File too
large for a single CAB-file might continue to the next file. (But no
more then 15 files might overlap to the next cab-file at a time.
Thanks.)
Well, extracting the CAB-file is not too hard. Fetch the record. Open a stream from column four. it seems like. Then we only have to worry about reading a CAB-file...
The CAB file
Ok. We have now a CAB file on disk. But how do we examine it? MSDN might be a starter. Also there is a project on CodeProject that claims to be a way to success.
Ohh. This seems hard.
We
have to create a Cabinet-instance. For it assign call-back functions to
handle all possible events that might happen. This is possible to do,
even when in a .NET environment as I am envisioning. However it sure
seem like a hassle.
Expand.exe
Microsoft has a stardard utility for handling cabinet files, expand.exe.
Microsoft (R) File Expansion Utility Version 6.1.7600.16385
Copyright (c) Microsoft Corporation. All rights reserved.
Expands one or more compressed files.
EXPAND [-R] Source Destination
EXPAND -R Source [Destination]
EXPAND -I Source [Destination]
EXPAND -D Source.cab [-F:Files]
EXPAND Source.cab -F:Files Destination
-R Rename expanded files.
-I Rename expanded files but ignore directory structure.
-D Display list of files in source.
Source Source file specification. Wildcards may be used.
-F:Files Name of files to expand from a .CAB.
Destination Destination file | path specification.
Destination may be a directory.
If Source is multiple files and -r is not specified,
Destination must be a directory.
So -D, to view the contents eh?
C:\temp>expand /d #TSVN.cab
Microsoft (R) File Expansion Utility Version 6.1.7600.16385
Copyright (c) Microsoft Corporation. All rights reserved.
#tsvn.cab: F__aprlicense
#tsvn.cab: F__BlipAddedIcon
#tsvn.cab: F__BlipCleanAddedIcon
#tsvn.cab: F__BlipCleanConflictIcon
#tsvn.cab: F__BlipCleanDeletedIcon
...
Oh, bugger. We don't have the original filename, only the ID from the File-table. Well it should be possible to make the lookup, even though it's a hassel.
Well, at least expand -F:F__FileID #TSVN.cab C:\Temp\TSV_cab_extracted
will extract a single file for me. Not ideal since there are a lot of
temp-files to juggle, but it should work unless I find something better.
Cabinet SDK?
Come on, there has to be some sort of SDK to manipulate Cabinet files. I cannot be the first one on eath to attempt this!
The
WiX-toolkit contains some DLLs to manipulate MSI and related tools.
Including the DLL Microsoft.Deployment.Compression.dll. I found a website which attempt to introduce these.
Using the WiX-toolkit I can get a System.IO.Stream
to the CAB-file included inside the MSI-file. If I can find some way to
operate on CAB-files using a stream-interface (or byte-arrays) I should
be home safe.
Maybe I'll revisit this method later, the expand.exe-solution will have to do for now.
Loose files, then?
It
is not mandatory to have your files in a cab-file, loose files are also
allowed. If I configure my installer to place loose files this is the
files in by installer build folder:
P:\Output>dir /b /S
P:\Output\UncompressedProject.msi
P:\Output\UncompressedProject_TargetDir\file1.exe
P:\Output\UncompressedProject_TargetDir\subfolder\file2.exe
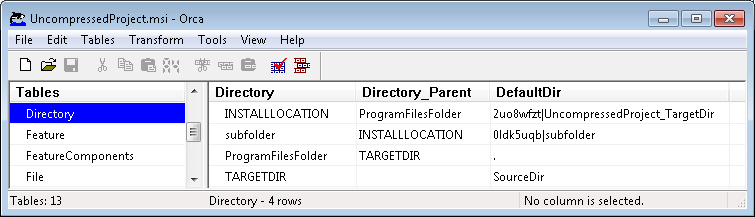
So
I have my MSI-file as usual. Also I have my two files, in some
subfolder thereunder. But how do I know that the folder is named UncompressedProject_TargetDir
as it is in my case? Well since I looked at my MSI I feel I might have
an idea. The long-name of the directory INSTALLLOCATION matches the
folder on disk. Let's hope it's not a coincidence. Gets get that record
from Directory-table and use everything after the | (pipe) character.
 In
my test-application I simply used the folder <location of
MSI>\<INSTALLLOCATION> and searched for *.* in that folder.
That gave me all loose files.
So there you have it. The File table contains lookups of what files actually should be called. Using Component and Directory in combination we know where the files should be. The Media table usually contains a CAB-file which in turn contains the files. (Named as their IDs.)
In
my test-application I simply used the folder <location of
MSI>\<INSTALLLOCATION> and searched for *.* in that folder.
That gave me all loose files.
So there you have it. The File table contains lookups of what files actually should be called. Using Component and Directory in combination we know where the files should be. The Media table usually contains a CAB-file which in turn contains the files. (Named as their IDs.)